If your business is not on Google Maps, it is effectively invisible to the customers searching for it right now. A Google Business Profile — previously known as Google My Business — is the tool that changes that. It is free, it is powerful, and setting it up correctly from the start determines how well your business performs in local search for years to come.
This guide walks through the entire setup process from scratch. Whether you are a first-time business owner or someone who has been putting this off for months, by the end of this tutorial your profile will be live, verified, and built to rank.
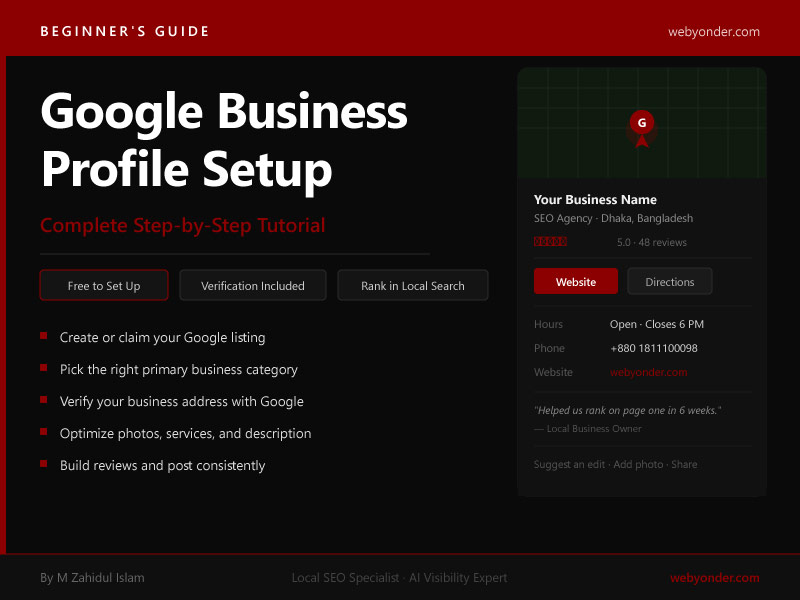
A Google Business Profile (GBP) is a free listing that controls how your business appears across Google Search and Google Maps. When someone searches for your business name or a service you offer in your city, your GBP is what generates the business card-style panel on the right side of search results and the listing on Google Maps.
It displays your business name, address, phone number, hours, website, photos, reviews, and the services you offer — all before a customer visits your website. For many local businesses, the GBP listing receives more customer interactions than the website itself.
A well-set-up GBP is the foundation of every local SEO strategy. Without it, none of the other local SEO work — citations, location pages, local links — reaches its full potential.
Before You Begin: What You Need
Before starting the setup process, gather the following:
- Your exact business name as it appears on your signage, legal documents, and website
- Your business address (or service area if you travel to customers)
- A local phone number for your business
- Your business website URL
- Your business hours for every day of the week
- A brief description of what your business does and where it operates
- Access to the email address you want to manage the profile with — preferably a business Gmail account
Having these ready before you start prevents errors mid-setup. Inconsistencies between what you enter in your GBP and what appears elsewhere online — your website, Facebook page, directories — directly affect your local search rankings. Get it right from the first entry.
Step 1: Go to the Google Business Profile Homepage
Open your browser and go to google.com/business. Click the blue “Manage now” button. You will be prompted to sign in with a Google account.
Use a Gmail account that your business owns and controls — not a personal email that a contractor or employee might lose access to. If you do not have a business Gmail, create one at gmail.com before proceeding. All future GBP notifications, review alerts, and management access will go to this email.
Step 2: Search for Your Business
Once signed in, Google will ask you to enter your business name. Type it in carefully — exactly as it will appear publicly.
Two things can happen here:
Your business already exists: Google often auto-generates listings based on public data. If your business appears in the dropdown, select it. This means a listing already exists and you need to claim it rather than create a new one. Claiming an existing listing avoids creating a duplicate, which can harm your local rankings.
Your business does not exist: If nothing appears or the matches are wrong, select “Add your business to Google.” You will then build the profile from scratch.
If your business is shown but already claimed by someone else — a previous employee, a web agency, or an old owner — you will need to request ownership through the “Request access” option. Google will contact the current manager. This process takes up to seven days.
Step 3: Enter Your Business Name
Type your business name exactly as it should appear to the public. This is one of the most important fields in your entire profile for one specific reason: Google prohibits adding keywords or location descriptors to your business name unless they are genuinely part of your registered trading name.
Correct: Webyonder Incorrect: Webyonder — Best SEO Agency in Dhaka
Adding keywords to your business name violates Google’s guidelines and can result in your listing being suspended or the name being edited by a third party. The business name field is for your real business name only.
Step 4: Choose Your Business Category
Your primary business category is the single most impactful field in your GBP. It tells Google what your business fundamentally is and directly determines which search queries you are eligible to appear for.
Google provides over 4,000 categories. Type a keyword related to your business and review what appears. Choose the most precise match available — not the broadest.
Examples:
- A dental clinic → “Dentist” not “Health Care Provider”
- A plumbing company → “Plumber” not “Home Services”
- A digital marketing agency → “Marketing Agency” or “SEO Agency”
- A restaurant → choose the specific cuisine type, not just “Restaurant”
You will have the opportunity to add secondary categories after initial setup. For now, select the one primary category that best represents your core business.
Step 5: Add Your Location or Service Area
Google now asks whether you have a physical location customers can visit.
If you have a storefront, office, or clinic customers come to: Select “Yes” and enter your full address on the next screen. Include street number, street name, city, postal code, and country. Do not use a P.O. box — Google does not accept them as business addresses.
After entering your address, Google will ask if you also serve customers outside your location. If you do, you can add a service area in addition to your address.
If you travel to customers and have no public-facing address: Select “No” and choose “I deliver goods and services to my customers.” You will then define a service area by city, region, or a radius around a central point. Your home or office address will not be shown publicly.
If you do both: Enter your physical address and then add your service areas on the next screen.
Accuracy here matters. Your location data is used by Google to determine how far your business is from searchers — one of the three core local ranking factors.
Step 6: Enter Your Contact Details
On this screen, enter your business phone number and website URL.
Phone number: Use a local number with your area code. Avoid toll-free numbers — local phone numbers reinforce geographic relevance to Google’s algorithm. Ensure the number is active and answered during your listed business hours.
Website: Enter your homepage URL. If you have a specific landing page built for local customers, you can use that instead. Ensure the URL you enter is live, loads quickly on mobile, and matches the business information you have entered in the profile.
If you do not yet have a website, you can skip this field and return to it later. Google also offers a basic free website built from your GBP data, though a custom website will always provide stronger local SEO support.
Step 7: Verify Your Business
Verification proves to Google that your business is real and that you are its legitimate owner. Until verification is complete, your listing has limited visibility in local search results.
Google offers several verification methods depending on your business type and location:
Postcard verification: The most common method. Google mails a postcard with a five-digit verification code to your business address. Delivery typically takes 3 to 7 business days. When it arrives, log in to your GBP dashboard and enter the code under the verification section.
Phone or SMS verification: Some business types qualify for immediate verification via an automated phone call or text message. If this option is available, it will appear on the verification screen.
Email verification: Available for some business categories. Google sends the verification code to your registered business email.
Video verification: Google may request a short video recording showing your business location, signage, and operating equipment. This has become more common as Google tightens verification requirements to combat fake listings.
Instant verification: If your website is already verified in Google Search Console with the same Google account, you may be instantly verified.
While waiting for your postcard, do not change your business address — this resets the verification process and a new postcard must be sent.
Step 8: Complete Your Business Hours
After verification is initiated, Google will take you through additional setup screens. The first is your business hours.
Enter your opening and closing times for every day of the week. If you are closed on a particular day, toggle that day off.
Special hours matter too. Google will prompt customers when your hours differ from the listed schedule — including holidays. Once your profile is live, keep your hours updated for public holidays and any temporary closures. An incorrectly listed “open” status during a closure frustrates customers and generates negative reviews.
If your business operates 24 hours, select the “Open 24 hours” option for the relevant days.
Step 9: Enable Messaging
Google allows customers to send you messages directly through your GBP listing via the “Message” button. Enabling this gives customers a low-friction way to contact you without calling.
If you enable messaging, you must respond within 24 hours. Google monitors response times and will turn off the messaging feature if you consistently fail to reply. Only enable messaging if you have a process to monitor and respond to incoming messages promptly.
Messages are managed through the Google Maps app on mobile or the GBP dashboard on desktop.
Step 10: Write Your Business Description
The description field gives you up to 750 characters to tell Google and potential customers what your business does, where it operates, and what makes it worth choosing.
Write it this way:
Open with your primary service and location. State clearly what you do and where. “Webyonder is a Dhaka-based SEO agency helping service businesses and e-commerce stores rank higher on Google and attract more customers through local search.”
Follow with your core service categories. Name the specific services you offer. Keep this factual and specific.
Close with a genuine differentiator. One true, specific statement about your approach, your experience, or your results.
Avoid:
- Promotional language like “best,” “number one,” or “top-rated”
- Phone numbers, URLs, or special characters
- Keyword stuffing — Google may edit or remove descriptions that appear manipulative
The description contributes to your relevance signal. Write it for a human reader who is deciding whether to contact you, and the SEO value follows naturally.
Step 11: Add Your Products and Services
After your description, Google will prompt you to add the services your business offers. This section is critical — it gives Google granular data about what you do, which directly expands the range of search queries your profile can appear for.
For each service:
- Enter the service name exactly as customers would search for it
- Write a description of 100 to 300 words explaining what the service involves
- Add a price or price range if applicable
Do not rush this section. A plumber who lists “Emergency Drain Unblocking,” “Pipe Leak Repair,” “Bathroom Fitting,” and “Boiler Installation” as separate services will appear for a wider range of relevant searches than one who lists only “Plumbing Services.”
If you offer products, the product catalog section works identically — name, description, photo, and price for each item.
Step 12: Upload Your First Photos
Photos are the final major step in the initial setup. Upload a minimum of five photos to start — you will build toward 20 or more in the weeks after launch.
At a minimum, upload:
A profile photo: This appears as the small circular image associated with your listing. Use your business logo or a clear, professional headshot if you are a personal brand.
A cover photo: This is the main image displayed at the top of your profile. Use a high-quality image of your storefront, your team, or your best work. This is the first visual impression your profile makes.
Three or more additional photos: Interior shots, exterior shots, or examples of your work and results. Do not use stock photos — they signal inauthenticity to both Google and potential customers.
All photos should be in JPEG or PNG format, at least 720 x 720 pixels, and under 5MB. Photos with natural lighting and genuine subject matter consistently outperform staged or promotional imagery in engagement.
Need expert help with your GBP setup?
Webyonder handles complete GBP setup, optimization, and ongoing management for service businesses.
What to Do in the First 30 Days After Setup
Your profile is now live, but setup is only the starting point. The businesses that rank consistently treat their GBP as an active, ongoing asset — not a one-time task.
In the first 30 days after going live, prioritize these actions:
Build your first reviews. Contact your five to ten most satisfied recent customers and ask them directly to leave a Google review. Send a short message with your review link — available inside your GBP dashboard under “Ask for reviews.” Your first reviews establish social proof and begin building your review velocity.
Make your first GBP post. Create a post introducing your business, sharing a recent project, or announcing a current offer. GBP posts appear directly on your listing and signal to Google that your profile is active. Post weekly from this point forward.
Verify your NAP consistency. Check that your business name, address, and phone number appear identically on your website, Facebook business page, and any other directories where your business is listed. Inconsistencies between these sources suppress local rankings.
Add secondary categories. Return to your profile settings and add secondary business categories that apply to additional services you offer. These expand your search eligibility without diluting your primary category signal.
Respond to the Q&A section. Before customers ask questions publicly, seed your own Q&A with the ten most common questions you receive before a new customer decides to hire you. Write clear, honest answers to each.
Common Google Business Profile Setup Mistakes to Avoid
Using a virtual office address: Google requires a genuine business address where staff are present during business hours. Virtual office addresses violate GBP guidelines and frequently result in suspension.
Choosing a broad category: “Business” or “Service” tells Google almost nothing. The more precise your category, the more relevant your search appearances.
Adding keyword phrases to your business name: This is against Google’s terms of service. It risks suspension and name edits by third parties.
Leaving the description generic: A description full of platitudes about quality and service communicates nothing to Google and converts no customers. Be specific.
Ignoring the profile after setup: A profile that was set up correctly but never updated will slowly lose ground to competitors who are actively posting, collecting reviews, and adding photos.
Frequently Asked Questions
Is Google Business Profile free to set up?
Yes. Creating and managing a Google Business Profile is completely free. Google does offer paid advertising products like Local Services Ads and Google Ads, but the organic GBP listing costs nothing.
How long does Google Business Profile setup take?
The initial setup takes 20 to 40 minutes to complete. Postcard verification adds 3 to 7 business days before your listing gains full visibility in local search results.
Can I set up a Google Business Profile without a website?
Yes. A website is not required to create or verify a GBP listing. However, having a website significantly improves your local rankings by providing additional relevance signals, location page content, and schema markup.
What is the difference between Google Business Profile and Google My Business?
They are the same product. Google rebranded Google My Business (GMB) as Google Business Profile in 2021. The dashboard and functionality remain the same.
Can I have more than one Google Business Profile?
Yes — if you have multiple legitimate business locations or operate distinct businesses, each one can have its own separate GBP listing. Each listing must have a unique physical address and go through the verification process independently.
What happens if my Google Business Profile gets suspended?
Suspension typically occurs due to guideline violations — keyword stuffing in the business name, using a virtual address, or creating duplicate listings. If suspended, you can submit a reinstatement request through the GBP Help Center with documentation proving your business is legitimate.
Your Profile Is Live — Now Build on It
Setting up your Google Business Profile correctly is the foundation of everything else in local SEO. It is the signal from which Google builds its understanding of your business, your location, and your relevance to local searchers.
But setup is the beginning, not the destination. The profiles that dominate local search are the ones maintained actively — with fresh photos, consistent reviews, weekly posts, and monthly performance checks.
Start with the foundation. Build from there. And treat your GBP not as a directory listing you checked off a list, but as the primary customer-facing asset it actually is.
Your Profile Is Live — Now Build on It
The profiles that dominate local search are maintained actively. Let Webyonder help you build from there.
Written by M Zahidul Islam — Local SEO Specialist and AI Visibility Expert. Helping service businesses and multi-location brands build resilient local search ecosystems. Visit webyonder.com/local-seo/ for a full overview of our Local SEO services.